 The
Gun Bucket
The
Gun Bucket
T-54 Tank
Building Report / Part I

Stage 1:
Welcome to T-Time ...
Akin to that herbal brew this tank series has many different 'flavours'.
As well as a myriad of types, 'The Beast' has gathered a bad reputation as a troublemaker over the years. From it's first combat appearance (my Dio) to the present day, it has been an eyesore for the free world.
Modellbuilders have also had their problems with it. The early Skif and Trumpeter kits being badly out of proportion with only the Tamiya T-55 serving as a base for all versions.
If this isn't bad enough, any mistake can be criticised by service personnel with fresh memories, who have worked on and fought in captured versions.
We do have a sea of colour pictures and other info on our side, but too much can lead to greater confusion. Scores of regimes as well as the Soviet, have chopped and changed details on this vehicle over time. So much so, that on occasion it's very hard to tell the basic type at all.
For a good read, I can suggest the Osprey publication: T54/55 MBT by Steven Zaloga.
My version will be the T54-3 (aka model 1951). That is, the Takom kit with the parts and gun of the Legend up-date set. The latters resin turret and smoke pots I intend to use on another project.
Why not the Tamiya kit then ... ? Well, lets just say: 'I was young and needed the parts' !
01.09.'16
Stage 2:
I'll let you in on a little secret here. Originally I was going to use this 'cheap and nasty' offering from Trumpeter for my Dio. However, after reading all the reports about this 'bad boy' and seeing the sometimes drastic measures taken to fix it, I decided to shelve it and go for the Takom version instead.

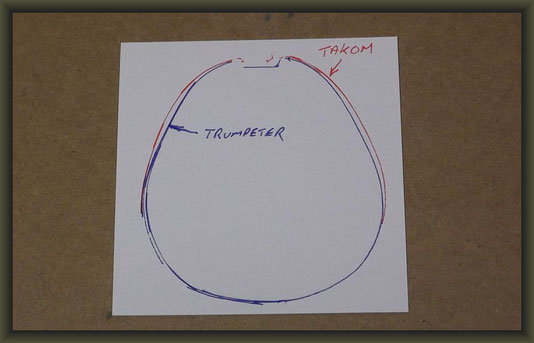
So far so good. Then I thought why not build them both for comparison. Here's some snapshots so's you can get a rough idea of how much they differ. Takom's in gray, Trumpeter in green.


Takom has the correct turret and rear wall wheras Trumpeter is bigger and rougher in every direction.
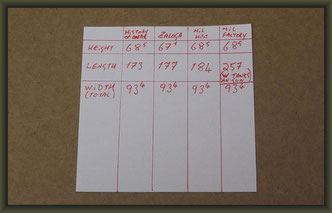
This made me inquisitive into finding out, how wrong the latter was. Fileing down the profiles on both wheels (I cant't imagine they had any after severn years) and cleaning up the tracks I set about converting some measurements via www and books. I've also compared the lower turret outlines ... not that much 'Milliput' in it really.


Now comes the crunch ...
It seems (at least for now) that Trumpeter and not Takom is closer to the mark !
Trumpeter's hull looks too small because it's fenders are too wide. Bearing in mind that a reduction in the latter would necessitate widening the former.
The most disturbing fact for me is that Takom's is at least 4mm too low. I suppose I could raise the suspension arms but even then ...

As a Dio builder I know that there's a lot of things you can hide or even present that'll make things seem otherwise (good oldfashiond bluff) but I'm going to have to use every trick I know for this one. I'll be putting this on hold for awhile until I get more info.
Let's hope (for me and Takom's sake) that I'm wrong here.
04.09.'16
Stage 3:
I'm happy to report that the Takom model represents an accurate T54. What threw me was that Trumpeter has used their T55 kit as a base for their T54. They have also made a measurement error in the overall height, making the hull too high. I shall take on this kit another time but "meanwhile back at the ranch"...
The underside of the fenders resembled the surface of the Moon, but happily all this was rectified with the assistance of Milliput and a garden spade. As I'm using the Legend update set, I don't need the locating holes. Takom's engine deck has been stripped of details before the conversion to a T54-3 deck. In comparison to original photo's, I've thickend the turrets roof armour (3mm plastic sheet). Notice how the early commanders cupola sits into it.

I've opted for the earlier idler wheels, so the kit's offering must be reworked. I think the rims of a Pz-38(t) should do the trick. The same treatment goes for the early (flatter) commanders
hatch. Luckily, Takom has supplied three late hatch versions (1x T55), so with two of these 'left-overs' and some 'scratch' work I should be able to get close to the mark.
A look underneath the hull reveals a T55 layout. Takom has since brought out a T54 version but I've just corrected here what will be visable.


One of the reasons why the T54 was such a good seller, was the 100mm glacis plate (prototypes had 120mm which made the vehicle more sluggish). I felt that the kit could do with a bit of a 'beefing-up' in this area, so I've adding 0,4mm of plastic sheet. Notice the (thicker) sloped armour effect on the upper edge.


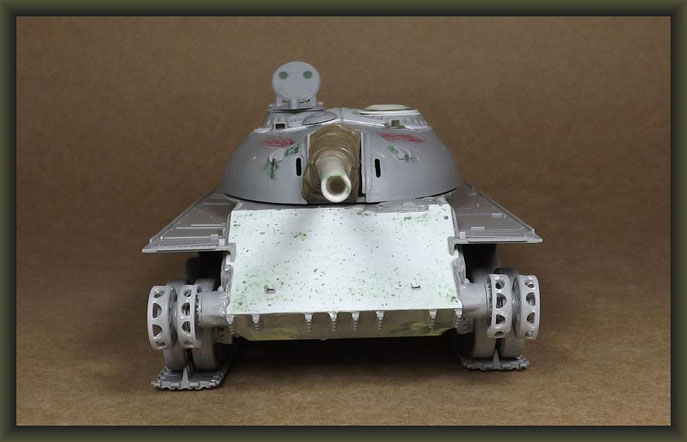
So then, I'll just fit all this loosely together and we'll take a walkaround ...
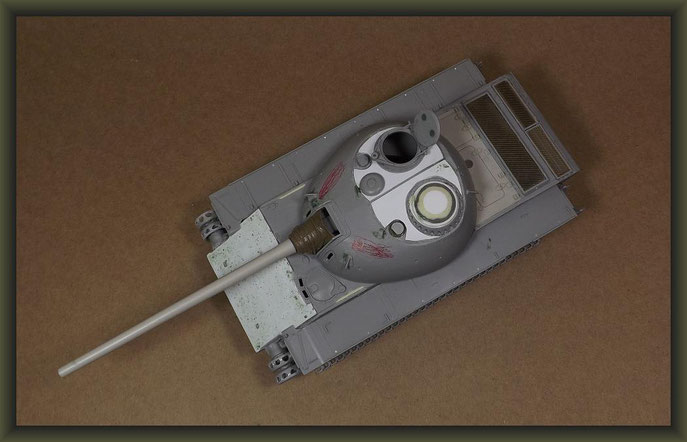
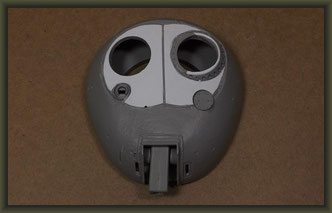
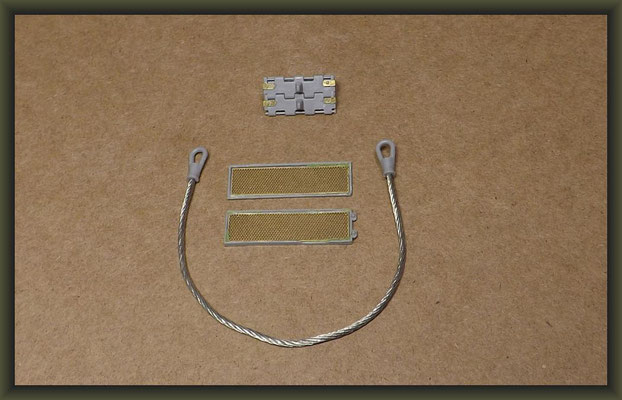
Legends gun barrel reduced by 12mm. Weld seams corrected on front upper hull. Front lifting hooks replaced (slightly).
Early commanders periscope fitted. IR equipment removed and holes plugged. Notice how the loaders cuppola sits on top of the roof. The resin engine deck fitted well into the frame although the rear PE mesh was a little undersize. Allthough Legend's kit was designed for the Tamiya T55, I still recomend Takom's for this particular version.
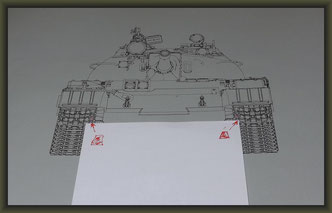
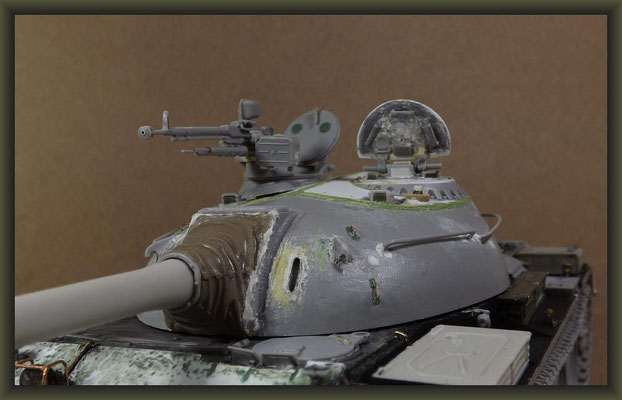
One of the many differences I've noticed, since my research of these two cold war monsters,
is that the T54 's turret is a little shallower on the front 'brow' than on the T55 (red marked area).
Another recognition feature is the turret roof ventilator. These were deleted on T55's whose's vent openings were to be found at the rear lower sides of the turret (marked blue).
ERROR: the small turret vents on the T-55 are at the FRONT in the 2 and 10 'o'clock position … I'll just have to live this one down! 😉
Incidentally, for those who are interested in the proportions of the T55 in comparison to the T54 i've found this site: http://www.pmulcahy.com/tanks/russian_tanks.html
Personally, after taking in all my research, I will never again use the term T54/55. I think for the sake of clarity they should be kept apart and not considered to be the same.

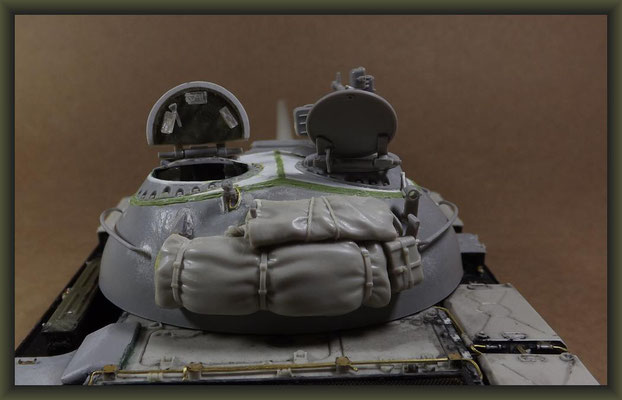
No questions so far ... Right, now I've got one for you. I know that the hull rim just in front of the turret has to be extended, but the thing is how ?
The kit parts for this step don't seem to fit at all and I can't make this area out very clearly on original pic's. As I have to fit tool boxes etc around it, I don't want to make a mistake and having to rip it all out later. Has anybody out there have any experience with this step?


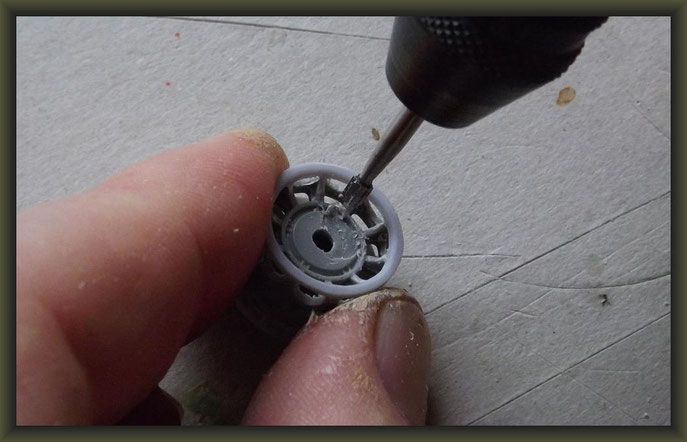
Side view of the early spider wheels. Takom has made a minor 'glitch' here in that they have only supplied eight hubcaps for ten wheels. As an added display of humour they have given us four idler wheel hubcaps. Having no spares I was left with no option but to grind two of them down. Notice that I have also 'flattend' them all slightly.


Nothing much to show here at the moment, just the deletion of one small plate. I've placed some filling materiel on top of the wheels to keep the track guards in line whilst drying.
Another Question ... there are two small baffle plates that can be folded over inside the ventilator screens. I think that they have something to do with the air flow (?) but I'm not sure.

The beast 'in-yer-face'...
I have no intention of 'blowing my own trumpet' but If this were a glossy magazine, I would say: "Cor, look at the idlers on that !!"
11.09.'16
Stage 4:

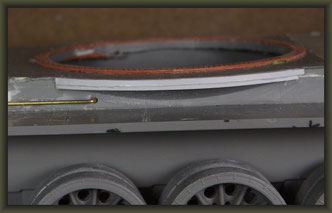
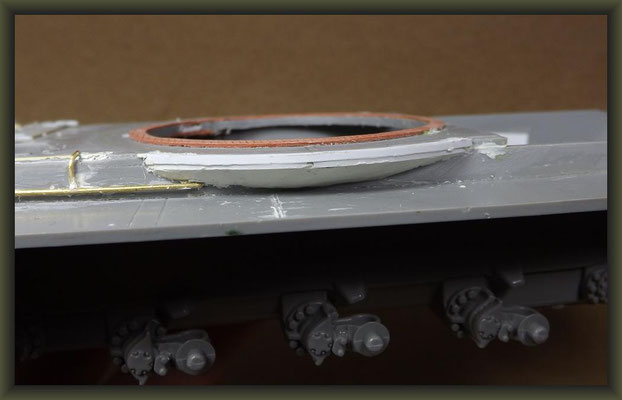
I've decided to fling the Takom parts into the spares box and extend the upper hull 'bulge' myself. I've glued a few strips of plastic sheet (1mm and 0.4mm) to the ring. The underside of which
will be kitted over to reproduce the rough cast effect. I must also fit the fender bracings in at the same time, so wish me luck.
Notice that I've raised the turret off the hull roof slightly (0.4mm) as is visable on actual vehicles.
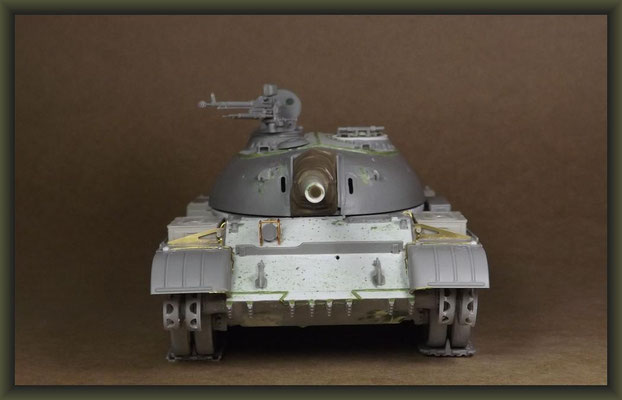


Another walkaround reveals the scratch building to the glacis. The commanders cupola is still looking a little rough but at least it now has the basic form.
I thought I'd have a bash at the early '49 rear fenders, the one's with the undiching post sinking into them. Most of the T-54's shown during the revolt seem to have them damaged or missing.
However, I think it would be safe to say that with the T-54 and T-55 the exception is the rule.
The early (welded) fuel tanks and zip boxes have been 'separated' from their casts and placed upon the fenders before the 'plumbing' begins, but that's for another time.

Arrgghh - resin blocks ... could'nt find the woodmans axe ... had to use the saw!!
17.09.'16
Stage 5:

One of the things I like about diorama building is that it can take you into topics and objects that you normaly would'nt be interested in.
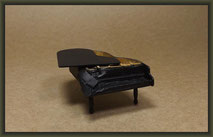
Well I know the piano looks as though it's been played by Les Dawson but 'It'll be allright on the night'. I've 'burnt out' the trolly from the Zwesda 120mm motar set and gave the advertising
collumn a 'stone' coat of Mr Surfacer.


Before I put the tracks together I checked them with my 'Budapest' pic's. Good job I did, for allthough Takom has supplied us with well detailed, spureless individual links ... they want us to put them on the wrong way round!

Source: sturgeonshouse.ipbhost.com

... 'where dat tank go'. Wheels and tracks cemented as a pair of solid units.
I noticed that the tracks were at an angle and therefore slightly proud of the front fenders.
So a quick milling of the inside face of the idler wheel was needed to bring it into line.


This bit is a right 'pigs ear'. While I was fitting the tracks I noticed that they sat a 'hairs breath' from the rear fenders. This made me check the fuel tanks in relation to the upper
hull, bearing in mind that they are to be raised by 0.3mm plastic strip - they still sat 1.2mm too low.
Swearing, cutting and kitting resulted in a realignment of the fenders and a more logical fit as regards track spacing and fuel tank height (level with top of hull).

On the left is Takoms later type fuel tank, sitting slightly high. On the right is 'my' Legend early (welded) tank.


To rectify the problem with the turret ring I've added a couple of plastic strips and built up the bulge accordingly.


While this was drying I scratch built the supporting frames making them slightly larger. They were then pushed into the still soft putty and cemented to the fenders.


A coat of Mr Surfacer to give them that cast look. Hmm ... maybe I should add a touch of Green Stuff - we'll see.


As my early version has only one headlight, I had to alter the gap of the 'plank' in front of it.
I've also spent some time around the drivers hatch and the area around his vision blocks.
The P.E. underside frame has been added and the engine bay has received a coat of black prior to assembly.
The 'ventilator baffels' (?) have been folded inside the righthand frame. Point to note - my '49 version arrangement has this frame opening to the right, whereas the lefthand frame opens toward
the rear. If you look closely you can see that I've filled in the latters location holes and prepaired their relocation on the back edge.


The tank crew consist of Hornet (Soviet post war) heads upon old Tamiya figures.
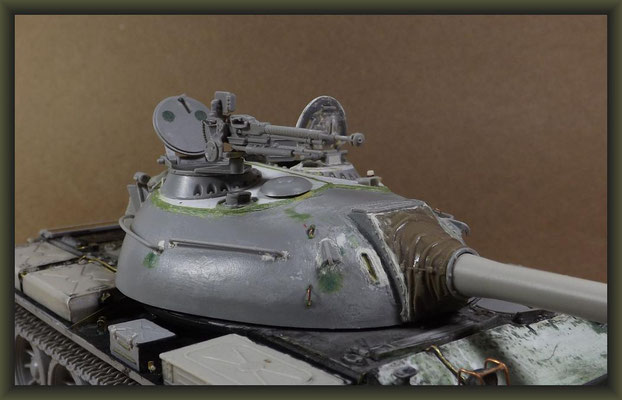
The 'early' cuppola is also coming along, not quite 100% scratch but as near as damm it!
26.09.'16
Stage 6:
The hull is now ready for priming. The Legend update set fitted very well, allthough I had to scratch build the rear fuel drum brackets. I didn't make them exact as I wanted to show them in a damaged state.
The green zip box (main gun cleaning tools) is from Trumpeter, being simpler it was more suited than Takom's.
Notice the chamfer on the rear side edges of the engine deck and how the handles to the front tool boxes hand over their brackets.
Oh, and before I go ... just one small point: If you fancy building this early version yourself, don't forget to eraise Takom's moulded-in fuel lines on the starboard fender ... the front toolbox does't hold diesel ;-)


29.09.'16
Stage 7:
I've also had my work cut-out with the turret. I've moved the gunners direct vision and co-axial m.g. slits slightly away from the gun mantlet. The latter is a hollow vinyl offering which I've filled with putty before fixing the gun with a nail and cryo.
There was no need for making metal hand rails as Takom's were quite adequate. Still, I had to move them all up a touch from their 'advised' location.
Nothing more to add (exept for all the weld seams), so I'll let you take it all in before the black primer gets to it.


Even considering that Legend and 'scratch' have gone into my version, there's still a load of stuff left over. Pity to waste, eh ... !


You CAN work hard and even fast on models but with figures ... well they just turn up when their ready. I've had the loader looking over his shoulder, seemed better that way. Anyhow, these two are going to need a few more 'appointments' before they're done.


01.10.'16
Stage 8:


All parts have been sprayed with acrylic black surface primer. I've only put the main units together for pics here (still damp). I usually give my models a drying time of about a week ... just to be on the safe side.
The 'piana' has received the same treatment. Once it's dry, I can start 'Chopin' it all up ...
Ha! Ha! ... get it ... Frédéric Chopin = chopping ... it's a j ... Aw, please yourselves ;-)
04.10.'16
Stage 9:


For the chipping effect, I've decantered some hair spray fluid and airbrushed it onto the tank and small parts in a thin coat.
After an hour or so drying, I sprayed on the base coat - allowing some of the black primer to show through. This time I've opted for a Tamiya mix of Olive Green, Olive Drab, Sky Blue and Black.
A cloud burst of the base coat plus a few drops of white (you could also use dark yellow for a more worn effect) highlights the larger areas.
I cannot give you the paint ratios as I don't know myself ... I always mix them 'rule of thumb'.
This may seem to many to be a catastrophic mistake, but if I were to apply the exact RAL number it would all change anyway after the coats of varnish, washings etc. I don't get involved with 'the perfect colour' discussions as even a 'factory fresh' vehicle reflects different tones from dawn till dusk.
09.10.'16
T-54 Tank / Building Report


Gerne können Sie mich auch auf deutsch
kontaktieren od. einfach einen entsprechenden Kommentar hinterlassen.
