 The
Gun Bucket
The
Gun Bucket
Aisne, N.France 1918
As the last of General Ludendorf's offensives ground to a halt towards the end of July, the allies were gearing up for a series of campaigns that would finaly defeat their enemy.
Begining with the Battle of Amiens (8 - 11th August) and ending with the Battle of the Sambre
(4 - 11th November), these combined actions not only forced the German Imperial Army back some 80 miles but left it in tatters.
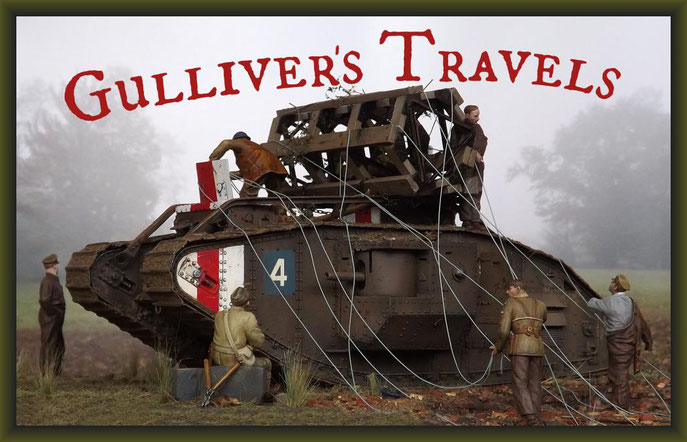
My interest was drawn to an action somewhere at the half water mark, General Rawlinson's Fourth Army and the Battle of the St Quentin Canal (29th September - 2nd October).
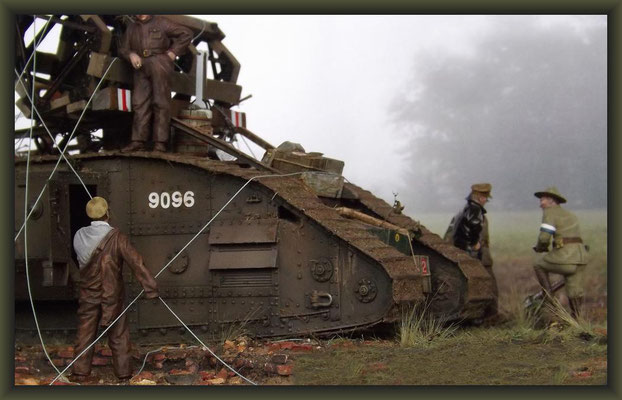
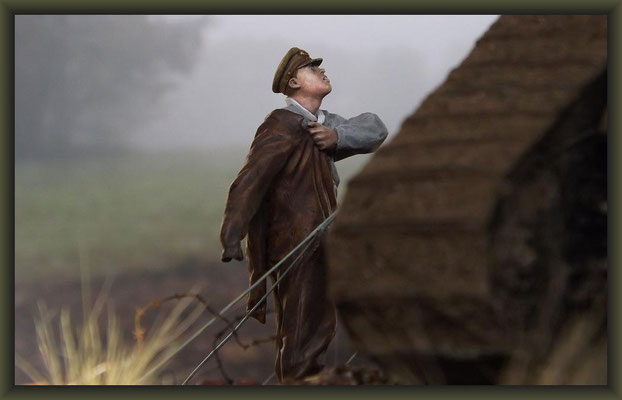
My Mk.V "Male" tank belongs to the British 4th Battalion Tank Corps, who's crew can be readily identified by their blue helmets and shoulder patches. This colour was adopted because of it's commanders naval background. After looking at photo's of some of these units tanks, I am happy that the number 4 represents the Battalion and not the crew number.
Some museum vehicles/models of this tank can be seen painted in a greenish tone. I personally am not convinced of this, as these tanks were built when all and sundry were still in a "trench warfare" (brown paint) old mind set.
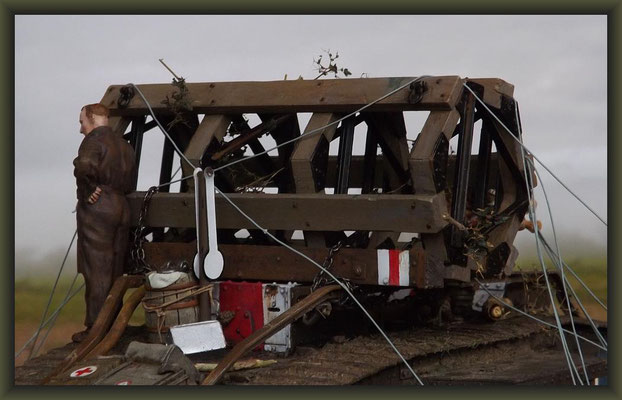
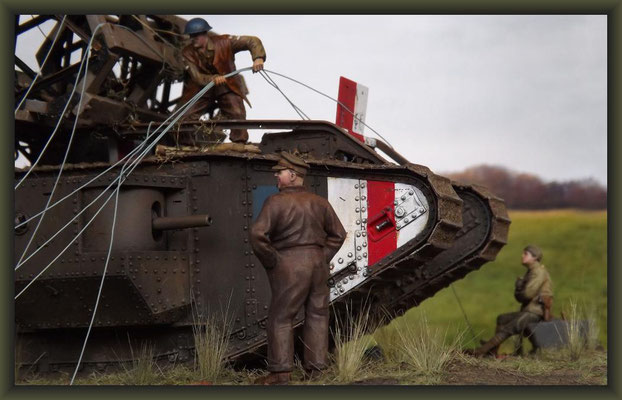
It has been recorded that this unit drew "Cribs" on the 21st September, still I couldn't help wondering what their trip to the front line would incur. After seeing one photo of a "Crib" placed in the centre of a tank, I hit upon an idea of one being "lassoed" by some telegraph wires. Hence the presence of some (not to happy) signalers of the U.S. 27th Infantry Division.
I have researched my tank to be the mount of a certain Lt Owen. Both, he and his crew, were still "on track" after the battle in October. This date was for my initial (Meng) diorama repair scene, praise Teutanis for Plan B.
The British Fourth Army succeeded in their task of clearing the Hindenburg Line and building a bridgehead over the fortified canal zone to the South. Alas, to the North the XIII Corps and the Australian Corps did not fare so well.
Being new to this "goddamned shooting gallery", the attached American infantry divisions learnt quickly but suffered terribly. Fog, confusion and determined German counterattacks in this area, saw the "Doughboys" well short of the mark in the early October light. Nevertheless, the overall pressure of these campaigns, using coordinated all arms tactics, paid off. For the Imperial German Army, the writing was very much on the wall.
As for my Diorama, I was tied down with so many problems that I had to rethink the time and place for my final destination.
This Dio has been a very long journey indeed and even though I didn't "get there" with my first attempt - I'm still happy with the result ... "The way was the goal itself".


Completed: 25.09.'18
British Mark V "Male" Tank
Building Report:
"The prodigal son returneth" ...

... but will this Gunbucket get there …

… or will he be pinned down – in his quest for the ominously missing and mysterious
"secret service" details. "Mum's the word" for this next Diorama.
Regards,
Evans the Spy 😉
Stage 1:
The final destination for this next cronological diorama should see me on the East Bank of the
St. Quentin Canal at the begining of October.
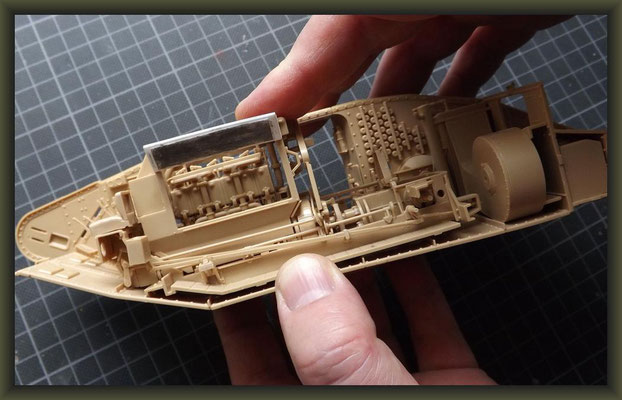
The transport that I've chosen to take us there, is the much advertised, appraised (not to mention expensive) Meng Mk.V 'Male' Tank. This is eventually to be displayed as an open model which is under repair at the end of the battle. Hence the work of opening up the asbestos lined pannels in order to show off the exellent depiction of the Ricardo engine.
Here's a few pics of my work so far :


A very easy fit with crisp surface detail. It all seemed to good to be true … which is precisely what it turned out to be.
Although I had collected as much information as I could of the Mk. V beforehand, every move I made actually building the thing brought with it more questions.
Here's the 'bucket's list':
- The front lower edges of the track sides didn't look right, they had sharp corners and not curved as did the originals … maybe some did have this feature but I could'nt find any in the myrad of photo's that I have been scrutinizing.
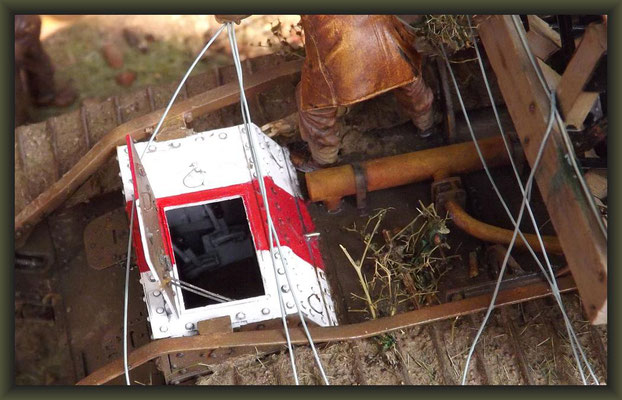
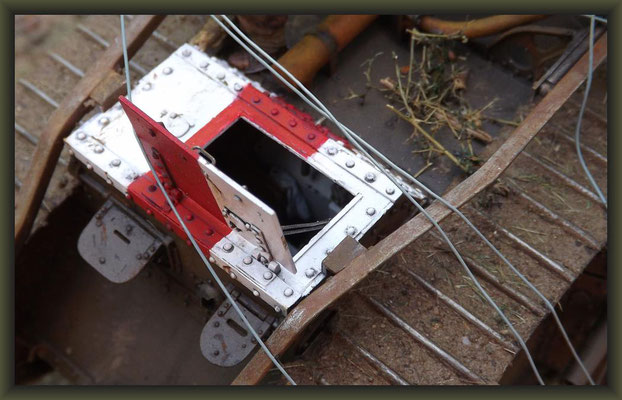
- Rear hatches too wide (?)
- Identifying unit markings ( 4th Btn) were also problematic.
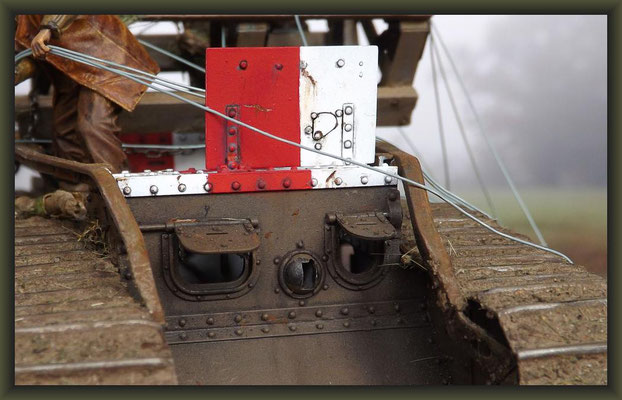
- The sponsons seemed to be a little on the large size and the unditching beam too long and thin.
- The interior was lacking the pipes (?) that ran just above and into the floor inside the front sponsons.
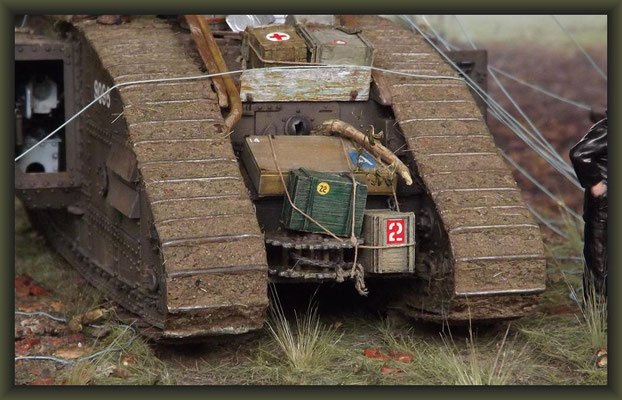
- No detail of the internal lockers.
- The apparatus of the guns fire direction system were missing as was info on the stowage of the 5 (one spare) Hotchkiss MG's.
Another vague guess from Meng was their "Crib" and it's suggested mode of attachment. Although I wasn't intending to use this device, it seemed an important problem that needed clarifying.
Even after mailing Landships II and Bovinton museum about the internal details I was left with little to go on. In fairness, the latter did explain that as these vehicles have undergone various repairs/alterations over the years a sworn accuracy could not be guaranteed. It seems there are no secrets, the explanation is - nobody knows.
Where do we go from here?
Well, as regards the internals, even with most of the frontal - mid hatches and doors open, not much of the interior can be seen anyway. So unless you're building an open or cut away version you could confidently press on without the missing details I've mentioned.
Unhappily for my original "open order" plan there's too much missing to achive the result I'm aiming for. The worst part though, is that the external faults cannot be overseen or corrected.
Feeling like a bit of a mug for being taken in with all the raves about this "amazing" (or should that be A- Maze -In) kit, I've decided to ear mark it for a future project.
"Oh shit ... there goes the charabang."
(The Stranglers)
Time to retrace my steps ...

… and take the long way home.
19.07.'18
Stage 2:
Welcome back to the stoney track.
This time around I'll explain graphically the faults of the Meng kit by comparing it up against it's Takom rival. Starting with the undiching beams - note how long and puny the Meng offering is to Takom's "dod of wood".

Here we have Meng's 6 pounder gun and Takom's slightly altered gun control arm. The former model as mentioned during my first attempt is a "little on the large side" overall, a milimeter I can live with ...

… this is what I can't. Some may argue that Takom's rear doors are too narrow, but I think not.
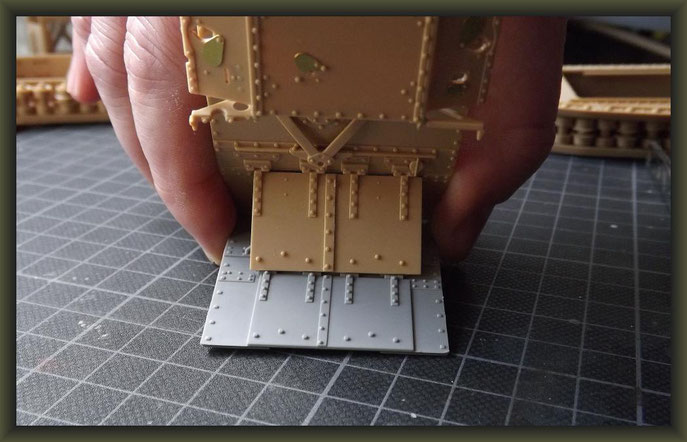
Sponson "Dot-Compare".
Apart from also being grossly oversized, Meng has left off the underside rivets ...

… and placed them erroneously down the center edge. Notice Takoms correct bolted depiction. Although not shown here, Meng's gun muzzles a rifleing to them. Alas, as the diameters are too large they have to be filled in and redrilled.


I'll leave you with the horrible angled front edge of "Meng the Merciless" …

… and a glimpse into the "cats cradle" of an internal scratchbuild.
27.07.'18
Stage 3:
We hit the road again with a correction this time to a Takom goof - their Mk. IV gun pedestal.
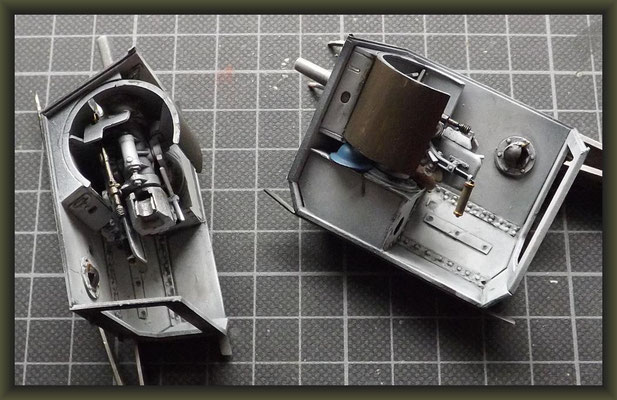
Using the Meng version as a template, I transfered the detail onto my model, correcting the slight size difference accordingly. I'll show you more of these when I've finished painting them. Using this method and (when necessary) adding extra detail from photo's, I gradually built up the interior. This cross copying can sure save a lot of go it alone scratchbuilding.


Well then, time for me to rest my legs and leave you to get "entangled" with my efforts so far:


02.08.'18
Stage 4:
I began this model with some trepidation that when it was finished, only THEN I would get all the "secret" info required.
Luckily, at this stage I obtained a copy of the Tankette magazine (52-1). Therein was an article by a certain Richard Harley that addressed the shortcomings of the Meng "male" kit. To my relief, the errors that I strongly suspected were confirmed in his report, plus a few others that I had not noticed. He also compares this model to the Takom "male", "female" and "hermaphrodite" kits.
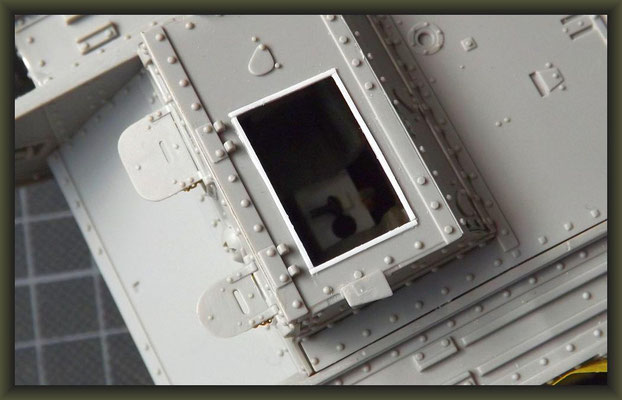
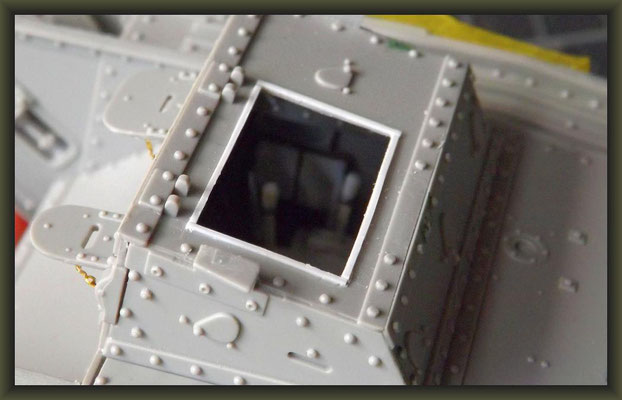
Obviously, I cannot reprint any of this but I can mention some of the corrections relevant to my Mk.V "male" as I go along. First, a quick peek through the cab roof. Via the above mentioned article, I learned that the bracket that is attached to the cab and roof, was only meant for tanks destined for Russia. As you can see, I'm in the middle of blanking off the gaps and detail for this fitting.


The original Hotchkiss MG's onboard the Mk.V's were a little shorter than the normal length, so I chopped down Takom's offerings to size here.

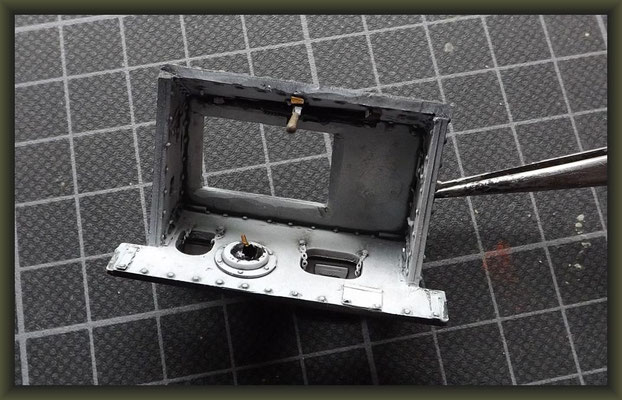
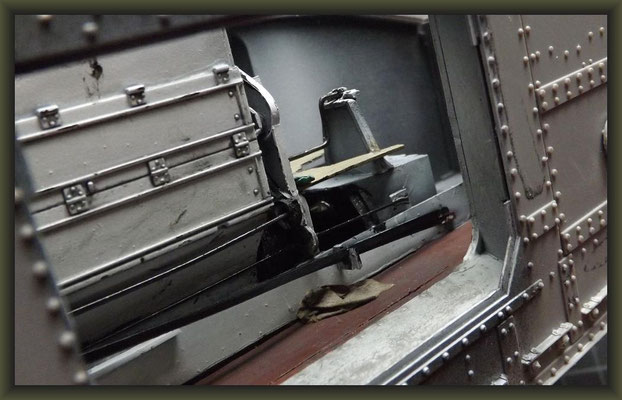
As promised, a sightseeing tour of the completed interior. I know it all looks a bit "ropey" but it's better to show some detail, as opposed to the empty crepuscular rays that shine through the other doors and hatches.The missing small details I mentioned earlier (cables etc.) remain a mystery. Thankfully, those area's cannot be seen on my half opened version. Note release handle for the CRIB device.


There's still some problems to be faced, but I'll cross those bridges when I come to them. For now though I'm gonna take a rest and soak my aching feet.
10.08.'18
Stage 5:
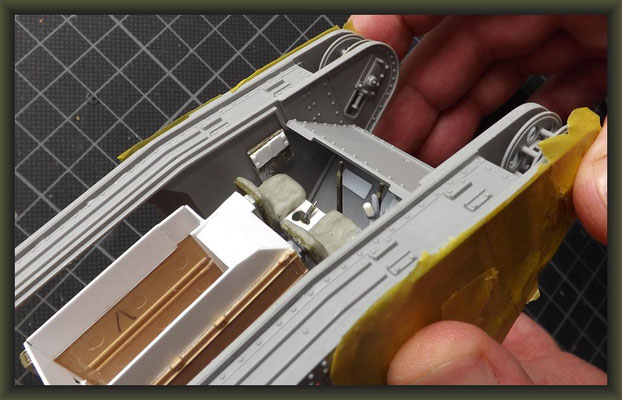
This time we'll take a wander around the main body.
Note that the undiching beam has been placed in it's normal position. Some points that I learned from the Tankette mag ...
For Mk.V remove the rivets on the hull sides, just in front of the top edge of the sponsons.
The sponson doors have another Mk.IV feature and that is the old prism vision boxes. These are to be replaced by the typical Mk.V rotating versions. Going by museum pictures, these are the triangular one's that can be cut off the Meng kit.


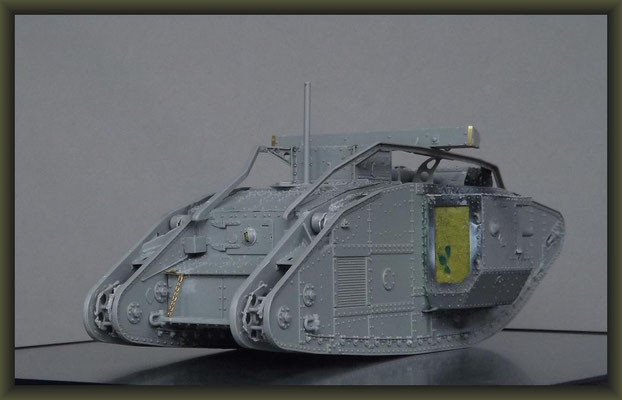


As you can see, I've changed the normal tracks for Masterclub's 26½ inch wide tracks. Clipping all the links together was an easy dowhill stroll. However, all this was negated by the uphill struggle to fit them to the Takom kit. I'll spare you most of the manic hacking and tearing of the wheels and get 'wired' into the figures for the next outing.
15.08.'18
Stage 6:
Taking a fresh bearing this time to "bash the little people" 😏 This is basically what I'm using ...


... along with a couple of Dragon Wehrmacht figures.
I've had second thoughts about the figure second from left and decided to scratch build the tank commander instead. The fella with the jerkin is from the Bronco 25 pounder gun crew set.

Bits and bobs ...

There's still a few "knots and snags" to sort out on them, for now though it's bye-bye.


Hope you've got some good nerves in your rucksack, 'cos next time we'll be stumbling along a very dark and twisted alley...
19.08.'18
Stage 7:
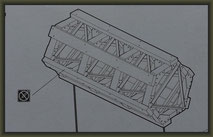
... yes, Meng's notorious Crib trench crossing device.
According to Dick Harley's report, Meng shows the Crib back to front and with one sleeper in the wrong position. I already suspected this by comparing it to some photo's of the time. What I did not know was the way of attaching the device over the drivers cab in the "ready" position. This configuration is different to the Mk. IV Fascine and involves six chains. As my model will see the Crib mounted elsewhere, I've left this step out.
For this job I'd still like you to "toe the line" as it were and pay particular attention to the small corrections … even if Meng didn't. We'll start with the "bits" and the Meng drawings ...


Here I've reworked the sleepers and cut off half of the locating tabs. The one with the tabs removed sits in the middle of one of the hexagon faces.

The next steps may seem to be confusing, but if you keep "orientated" by holding the first Hexagon frame with the outer angle iron pointed towards you …
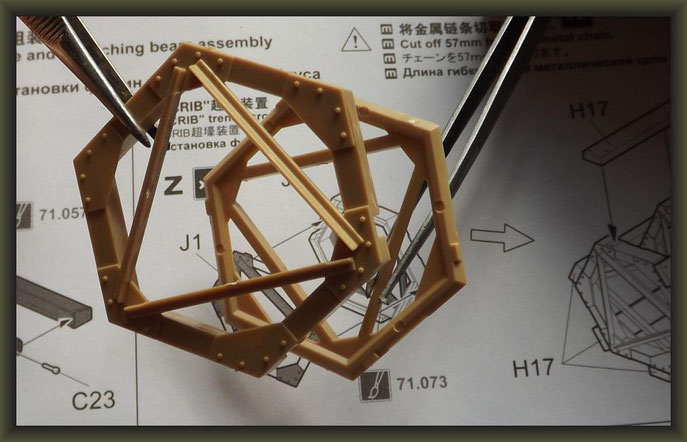
… you can fabricate the rest easily:

Notice that the sleepers have been repositioned further away from the edges and that the "rear" sleeper sits in the middle of one side of the frames.
Another thing to watch out for is that the third angle iron frame from the left has been turned. At first I thought this was a one-off mistake from an actual photo. However, on close inspection of other Cribs "going up the line" I can tell you this is the norm. Why this was done … I don't know. Maybe for extra stability?
Anyhow, I've marked the frame in question in red so you won't … er … lose your way.


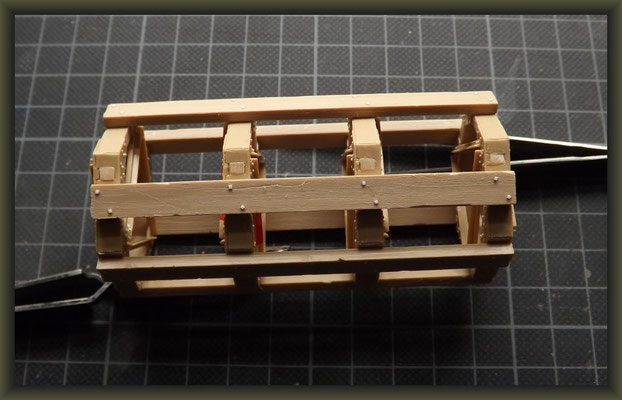


I'll leave you to get "bound up" in all this, while I push on to our next rendezvous … the base and stageing.
25.08.'18
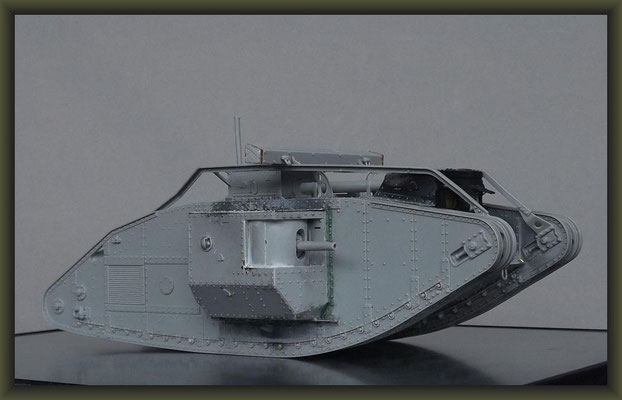
Stage 8:
One "final cable" ... a walk around the whole kaboosh before completion. See you at the finish line ...


... or should that be the start line ?
No matter, I'll just leave the last leg up to you.
01.09.'18


Gerne können Sie mich auch auf deutsch
kontaktieren od. einfach einen entsprechenden Kommentar hinterlassen.
